> ## Documentation Index
> Fetch the complete documentation index at: https://docs.comfystream.org/llms.txt
> Use this file to discover all available pages before exploring further.
# Super Resolution
> Upscale video frames in real-time using GPU acceleration.
## Introduction
The **Super Resolution** node **upscales** video frames with pre-trained models. The process leverages GPU acceleration through [OpenCV](https://opencv.org/) compiled with CUDA support, ensuring exceptional speed ideal for real-time applications. When using workflows with base Stable Diffusion models optimized for **512x512**, higher resolutions can compromise efficiency and FPS. In these scenarios, a dedicated super-resolution node allows upscaling without significantly affecting performance or quality.
## Setup Method
The node is optimized for high-speed upscaling and requires OpenCV with CUDA support. By running ComfyStream with the **[Docker setup](/technical/get-started/install#install-with-docker)**, you get a precompiled package from [ComfyUI-Stream-Pack/releases](https://github.com/JJassonn69/ComfyUI-Stream-Pack/releases/tag/v1.0) included in the Docker image. This eliminates the need for manual compilation.
If you prefer to install OpenCV with CUDA support manually, follow the guide in article [Installing OpenCV with CUDA Support](https://medium.com/@juancrrn/installing-opencv-4-with-cuda-in-ubuntu-20-04-fde6d6a0a367).This guides you through the multiple steps and prerequisites needed to successfully compile OpenCV package.
You can use the following code block as a reference, modify the paths and variables to match your system.
```bash [expandable] theme={null}
# Install system libraries required for compiling opencv
apt update && apt install -yqq \
git \
wget \
nano \
socat \
libsndfile1 \
build-essential \
llvm \
tk-dev \
cmake \
libgflags-dev \
libgoogle-glog-dev \
libjpeg-dev \
libavcodec-dev \
libavformat-dev \
libavutil-dev \
libswscale-dev
# Clone OpenCV repositories
git clone --depth 1 --branch 4.11.0 https://github.com/opencv/opencv.git
git clone --depth 1 --branch 4.11.0 https://github.com/opencv/opencv_contrib.git
# Create build directory
mkdir -p opencv/build
# Create a toolchain file with absolute path
cat > custom_toolchain.cmake << EOF
# Custom toolchain file to exclude Conda paths
# Set system compilers
set(CMAKE_C_COMPILER "/usr/bin/gcc")
set(CMAKE_CXX_COMPILER "/usr/bin/g++")
# Set system root directories
set(CMAKE_FIND_ROOT_PATH "/usr")
set(CMAKE_FIND_ROOT_PATH_MODE_PROGRAM NEVER)
set(CMAKE_FIND_ROOT_PATH_MODE_LIBRARY ONLY)
set(CMAKE_FIND_ROOT_PATH_MODE_INCLUDE ONLY)
set(CMAKE_FIND_ROOT_PATH_MODE_PACKAGE ONLY)
# Explicitly exclude Conda paths
list(APPEND CMAKE_IGNORE_PATH
"/workspace/miniconda3"
"/workspace/miniconda3/envs"
"/workspace/miniconda3/envs/comfystream"
"/workspace/miniconda3/envs/comfystream/lib"
)
# Set RPATH settings
set(CMAKE_SKIP_BUILD_RPATH FALSE)
set(CMAKE_BUILD_WITH_INSTALL_RPATH FALSE)
set(CMAKE_INSTALL_RPATH "/usr/local/lib:/usr/lib/x86_64-linux-gnu")
set(PYTHON_LIBRARY "/workspace/miniconda3/envs/comfystream/lib/")
set(CMAKE_INSTALL_RPATH_USE_LINK_PATH TRUE)
EOF
# Set environment variables for OpenCV
echo 'export LD_LIBRARY_PATH=/usr/local/lib:$LD_LIBRARY_PATH' >> ~/.bashrc
source ~/.bashrc
# Build and install OpenCV with CUDA support
cd opencv/build
cmake \
-D CMAKE_TOOLCHAIN_FILE=/workspace/custom_toolchain.cmake \
-D CMAKE_BUILD_TYPE=RELEASE \
-D CMAKE_INSTALL_PREFIX=/usr/local \
-D WITH_CUDA=ON \
-D WITH_CUDNN=ON \
-D WITH_CUBLAS=ON \
-D WITH_TBB=ON \
-D CUDA_ARCH_LIST="8.0+PTX" \
-D OPENCV_DNN_CUDA=ON \
-D OPENCV_ENABLE_NONFREE=ON \
-D CUDA_TOOLKIT_ROOT_DIR=/usr/local/cuda \
-D OPENCV_EXTRA_MODULES_PATH=/workspace/opencv_contrib/modules \
-D PYTHON3_EXECUTABLE=/workspace/miniconda3/envs/comfystream/bin/python3.11 \
-D PYTHON_INCLUDE_DIR=/workspace/miniconda3/envs/comfystream/include/python3.11 \
-D PYTHON_LIBRARY=/workspace/miniconda3/envs/comfystream/lib/libpython3.11.so \
-D HAVE_opencv_python3=ON \
-D WITH_NVCUVID=OFF \
-D WITH_NVCUVENC=OFF \
..
make -j$(nproc)
make install
ldconfig
```
This will install the opencv package **cv2** in `/usr/local/lib/python3.11/site-packages`.
Since the opencv compiles with a specific version of numpy make sure to have the same numpy version in your environment.
After the compilation, you can verify that OpenCV is installed correctly by running:
```bash theme={null}
python3 -c "import cv2; print(cv2.cuda.getCudaEnabledDeviceCount())"
```
This should output `1` or higher depending on the number of CUDA-enabled devices in your machine if installation was successful.
## Adding the Node
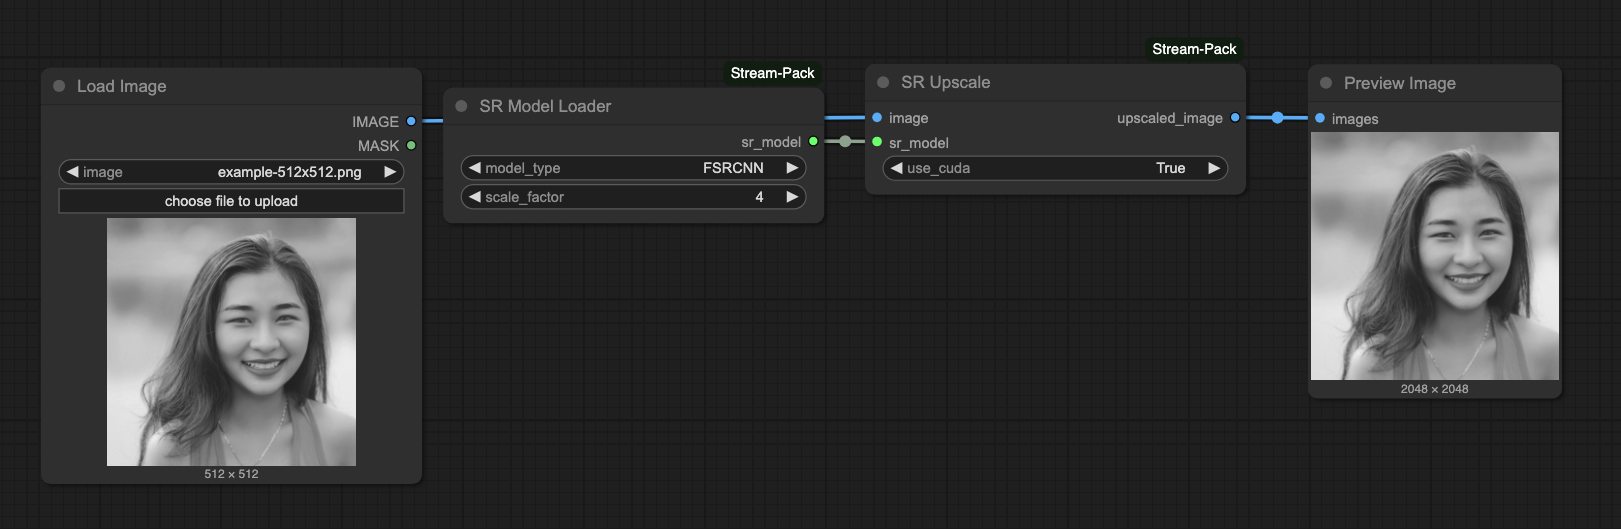
An example upscaling workflow using the Super Resolution node is available
[here](https://github.com/livepeer/ComfyUI-Stream-Pack/blob/main/examples/workflows/super-res-fscnn-upscale-2x-gpu-api.json).
Ensure the [StreamPack](https://github.com/livepeer/ComfyUI-Stream-Pack) custom nodes are installed in your ComfyUI setup. Follow the [installation instructions](/technical/custom-nodes/stream-pack/overview#installation) for a step-by-step guide.
Right-click on an empty area of the canvas and choose **Add Node**.
Search for `SuperResolution` under the `StreamPack/` category.
There are two nodes under SuperResolution: `SR Model Loader` and `SR Upscale`. You need both to upscale, so place them on the canvas.
* In `SR Model Loader`, you'll see widgets to select the upscaling model and scale factor.
* Connect the output of `SR Model Loader` to the input of `SR Upscale`.
* In the `SR Upscale` node, toggle the `use CUDA` widget to `true` to enable CUDA acceleration.
* Connect an image to the input of `SR Upscale` and a preview node to the output.
 ## Parameters
The following parameters control how the Super Resolution models behave:
* **Select the Model for Upscaling** – Choose the model based on desired upscaling quality and performance; refer to the comparison table above.
* **Scaling Factor Selection** – Consider the required output resolution when choosing the scale factor. A higher scaling factor increases processing time, potentially reducing real-time performance.
* **Using CUDA Acceleration** – While CPU can be used for upscaling, it is significantly slower. Use CUDA acceleration for optimal performance.
### SR Model Loader Node
**Model Type**: Select the upscaling model to use. The quality and performance
vary by model. Models are downloaded and loaded automatically when selected in
the canvas. Below is a basic comparison of the models.
| Model | Architecture | Features | Best For | Speed | Quality |
| ---------------- | ------------------------ | ----------------------------- | ---------------------------- | ----- | ------- |
| **FSRCNN-small** | Lightweight CNN | Fast, minimal memory use | Real-time processing, mobile | ★★★★★ | ★★ |
| **FSRCNN** | CNN with larger features | Good balance of speed/quality | General purpose | ★★★★ | ★★★ |
| **ESPCN** | Sub-pixel convolutions | Efficient upscaling at end | Text/line drawings | ★★★★ | ★★★ |
| **VDSR** | Very deep CNN | Better edge reconstruction | Detailed images with edges | ★★★ | ★★★★ |
| **LapSRN** | Laplacian pyramid | Progressive upscaling | Sharp edges, details | ★★★ | ★★★★ |
| **EDSR** | Deep residual network | Most parameters, best quality | Maximum detail | ★★ | ★★★★★ |
**Scale Factor**: Select the upscaling factor. The image will be upscaled by
this factor. For example, if the input image is `512x512`, the output will be
`1024x1024` with a scale factor of `2`.
### SR Upscale Node
**Use CUDA**: Toggle to `true` to enable CUDA acceleration for upscaling.
## Strengths and Limitations
While the Super Resolution node offers significant performance benefits compared to other upscaling methods, it also introduces a few trade-offs depending on your use case.
### Strengths
* **Wide suite of supported models** – Option to choose from multiple models (FSRCNN, ESPCN, LapSRN, EDSR) with different quality/speed tradeoffs.
* **Modular Design** – Once a model is loaded, it can be reused across multiple upscaling operations.
* **Fast performance via CUDA** – Configurable CUDA acceleration for optimal performance.
* **Multiple Scale Factors** – Support for 2x, 3x, and 4x upscaling.
### Limitations
* **Setup Complexity** – The node requires a version of OpenCV with CUDA support, which may require additional setup, since the CUDA is only available for NVIDIA GPUs, it will not work on other GPUs.
## Acknowledgments
This nodepack implements models originally created by:
* [FSRCNN (Dong et al., 2016)](https://mmlab.ie.cuhk.edu.hk/projects/FSRCNN.html) – [GitHub Repository](https://github.com/ryanontheinside/FSRCNN_Tensorflow)
* [EDSR (Lim et al., 2017)](https://arxiv.org/abs/1707.02921) – [GitHub Repository](https://github.com/ryanontheinside/EDSR_Tensorflow)
* [ESPCN (Shi et al., 2016)](https://arxiv.org/abs/1609.05158) – [GitHub Repository](https://github.com/ryanontheinside/TF-ESPCN)
* [LapSRN (Lai et al., 2017)](https://arxiv.org/abs/1710.01992) – [GitHub Repository](https://github.com/ryanontheinside/TF-LapSRN)
## Parameters
The following parameters control how the Super Resolution models behave:
* **Select the Model for Upscaling** – Choose the model based on desired upscaling quality and performance; refer to the comparison table above.
* **Scaling Factor Selection** – Consider the required output resolution when choosing the scale factor. A higher scaling factor increases processing time, potentially reducing real-time performance.
* **Using CUDA Acceleration** – While CPU can be used for upscaling, it is significantly slower. Use CUDA acceleration for optimal performance.
### SR Model Loader Node
**Model Type**: Select the upscaling model to use. The quality and performance
vary by model. Models are downloaded and loaded automatically when selected in
the canvas. Below is a basic comparison of the models.
| Model | Architecture | Features | Best For | Speed | Quality |
| ---------------- | ------------------------ | ----------------------------- | ---------------------------- | ----- | ------- |
| **FSRCNN-small** | Lightweight CNN | Fast, minimal memory use | Real-time processing, mobile | ★★★★★ | ★★ |
| **FSRCNN** | CNN with larger features | Good balance of speed/quality | General purpose | ★★★★ | ★★★ |
| **ESPCN** | Sub-pixel convolutions | Efficient upscaling at end | Text/line drawings | ★★★★ | ★★★ |
| **VDSR** | Very deep CNN | Better edge reconstruction | Detailed images with edges | ★★★ | ★★★★ |
| **LapSRN** | Laplacian pyramid | Progressive upscaling | Sharp edges, details | ★★★ | ★★★★ |
| **EDSR** | Deep residual network | Most parameters, best quality | Maximum detail | ★★ | ★★★★★ |
**Scale Factor**: Select the upscaling factor. The image will be upscaled by
this factor. For example, if the input image is `512x512`, the output will be
`1024x1024` with a scale factor of `2`.
### SR Upscale Node
**Use CUDA**: Toggle to `true` to enable CUDA acceleration for upscaling.
## Strengths and Limitations
While the Super Resolution node offers significant performance benefits compared to other upscaling methods, it also introduces a few trade-offs depending on your use case.
### Strengths
* **Wide suite of supported models** – Option to choose from multiple models (FSRCNN, ESPCN, LapSRN, EDSR) with different quality/speed tradeoffs.
* **Modular Design** – Once a model is loaded, it can be reused across multiple upscaling operations.
* **Fast performance via CUDA** – Configurable CUDA acceleration for optimal performance.
* **Multiple Scale Factors** – Support for 2x, 3x, and 4x upscaling.
### Limitations
* **Setup Complexity** – The node requires a version of OpenCV with CUDA support, which may require additional setup, since the CUDA is only available for NVIDIA GPUs, it will not work on other GPUs.
## Acknowledgments
This nodepack implements models originally created by:
* [FSRCNN (Dong et al., 2016)](https://mmlab.ie.cuhk.edu.hk/projects/FSRCNN.html) – [GitHub Repository](https://github.com/ryanontheinside/FSRCNN_Tensorflow)
* [EDSR (Lim et al., 2017)](https://arxiv.org/abs/1707.02921) – [GitHub Repository](https://github.com/ryanontheinside/EDSR_Tensorflow)
* [ESPCN (Shi et al., 2016)](https://arxiv.org/abs/1609.05158) – [GitHub Repository](https://github.com/ryanontheinside/TF-ESPCN)
* [LapSRN (Lai et al., 2017)](https://arxiv.org/abs/1710.01992) – [GitHub Repository](https://github.com/ryanontheinside/TF-LapSRN)