> ## Documentation Index
> Fetch the complete documentation index at: https://docs.comfystream.org/llms.txt
> Use this file to discover all available pages before exploring further.
# Install ComfyStream
> Learn how to install ComfyStream using Docker or as a custom node for ComfyUI.
ComfyStream is available as a custom node through the [ComfyUI Manager](https://registry.comfy.org/nodes/comfystream) or as a Docker image. Follow the method that best suits your setup.
You can also install Comfystream by cloning the repository into your ComfyUI/custom\_nodes folder — see [Manual Installation](/technical/get-started/install#manual-installation-cloning-repository) for details.
Install ComfyStream directly into an existing ComfyUI setup.
Run ComfyStream and ComfyUI together in a prebuilt Docker container.
***
## Install with ComfyUI Manager
If you already have ComfyUI installed, the easiest way to install ComfyStream is via the built-in **ComfyUI Manager**.
Download and install [ComfyUI](https://github.com/hiddenswitch/ComfyUI?tab=readme-ov-file#installing) if you haven't already.
Currently **comfystream** works only with the [hiddenswitch
fork](https://github.com/hiddenswitch/ComfyUI) of ComfyUI, the team is
actively working add full support for [official
ComfyUI](https://github.com/comfyanonymous/ComfyUI).
ComfyUI must be run with frontend version `v1.24.2` or older. You can do this by launching ComfyUI with the flag `--front-end-version Comfy-Org/ComfyUI_frontend@v1.24.2`
Follow the [ComfyUI Manager installation guide](https://docs.comfy.org/essentials/core-concepts/nodes#installing-the-manager) if you haven't already.
1. Launch **ComfyUI**.
2. Open the **Manager** tab.
3. Search for **ComfyStream** and click **Install**.
Restart your ComfyUI server to load the new custom node.
## Manual Installation
If you prefer more control over the installation process, you can install ComfyStream manually using one of the following methods:
Python 3.12 or greater is required
The following commands install the latest version of ComfyUI and ComfyStream
```bash theme={null}
pip install comfy-cli
comfy install
comfy node registry-install comfystream
```
After completing the installation, start ComfyUI with the following command
```bash theme={null}
comfy launch -- --listen 0.0.0.0 --port 8188 --front-end-version Comfy-Org/ComfyUI_frontend@v1.24.2
```
This will start the ComfyUI server with ComfyStream installed.
If you prefer to install ComfyStream manually by cloning the repository instead of using the Manager, follow these steps:
```bash theme={null}
git clone https://github.com/comfyanonymous/ComfyUI
cd ComfyUI
pip -r requirements.txt
cd custom_nodes
git clone https://github.com/livepeer/comfystream.git
cd comfystream
python install.py
```
After completing the installation, navigate to the root of the ComfyUI directory.
```bash theme={null}
cd ComfyUI
python main.py --listen --front-end-version Comfy-Org/ComfyUI_frontend@v1.24.2
```
This will start the ComfyUI server with ComfyStream installed.
***
## Install with Docker
Run ComfyStream in a prebuilt Docker environment, either on your own GPU or a cloud server.
Run ComfyStream locally with your own GPU.
Deploy ComfyStream on a remote GPU using RunPod or Ansible.
### Local GPU
If you have a compatible GPU on Windows or Linux, you can run ComfyStream locally via Docker.
#### Prerequisites
First, install the required system software:
* [Docker
Engine](https://docs.docker.com/engine/install/ubuntu/#install-using-the-repository)
* [NVIDIA CUDA
Toolkit](https://developer.nvidia.com/cuda-12-8-1-download-archive?target_os=Linux\&target_arch=x86_64\&Distribution=Ubuntu\&target_version=24.04\&target_type=runfile_local)
* [NVIDIA Container
Toolkit](https://docs.nvidia.com/datacenter/cloud-native/container-toolkit/latest/install-guide.html)
* From a new command prompt, run: `wsl --install` - Update WSL if
needed: `wsl.exe --update`
Open a new **Ubuntu (WSL)** tab from Terminal.
Inside of WSL, install [NVIDIA CUDA
Toolkit](https://developer.nvidia.com/cuda-12-8-1-download-archive?target_os=Linux\&target_arch=x86_64\&Distribution=WSL-Ubuntu\&target_version=2.0\&target_type=runfile_local)
Install [Docker
Desktop](https://docs.docker.com/get-started/introduction/get-docker-desktop/).
Ensure Docker Desktop is set to use the WSL 2 Engine in settings.
Inside WSL: `docker ps` should return a result.
Proceed with the next steps in your WSL terminal.
#### Run the Docker Container
These folders store your models and generated outputs. Docker mounts them into the container.
```bash Linux theme={null}
mkdir -p ~/models/ComfyUI--models ~/models/ComfyUI--output
```
```batch Command Line theme={null}
mkdir %USERPROFILE%\models\ComfyUI--models %USERPROFILE%\models\ComfyUI--output
```
```powershell PowerShell theme={null}
New-Item -ItemType Directory -Path "$env:USERPROFILE\models\ComfyUI--models", "$env:USERPROFILE\models\ComfyUI--output"
```
```bash theme={null}
docker pull livepeer/comfystream:stable
```
If using Windows, ensure Docker Desktop is running first.
```bash theme={null}
docker run -it --gpus all \
-p 8188:8188 \
-p 8889:8889 \
-p 5678:5678 \
-p 3000:3000 \
-v ~/models/ComfyUI--models:/workspace/ComfyUI/models \
-v ~/models/ComfyUI--output:/workspace/ComfyUI/output \
livepeer/comfystream:stable --download-models --build-engines --server
```
Available flags:
* `--download-models` downloads some default models
* `--build-engines` optimizes the runtime for your GPU
* `--server` starts ComfyUI server (accessible on port 8188)
* `--api` enables the API server
* `--ui` starts the ComfyStream UI (accessible on port 3000)
* `--use-volume` should be used with a mount point at /app/storage. It is used during startup to save/load models and compiled engines to a host volume mount for persistence
The `--download-models` and `--build-engines` flags are only needed the first time (or when adding new models).
Open your browser and go to [http://localhost:8188](http://localhost:8188) to start using ComfyUI with ComfyStream.
The ComfyStream UI is available at [http://localhost:3000](http://localhost:3000) where you can start live streams directly by keeping the stream URL as `http://localhost:8889` and selecting a workflow.
 ### Remote GPU
If you don't have a local GPU, you can run ComfyStream on a cloud server. Choose between a managed deployment with **RunPod** or manual setup using **Ansible**.
#### Run with RunPod
RunPod provides a simple one-click deployment of ComfyStream in a managed container environment — perfect for testing or avoiding manual setup.
Use this template to get started:
[livepeer-comfystream](https://console.runpod.io/deploy?template=w01m180vxx\&ref=u8tlskew)
RunPod does not persist pod data by default. To ensure models and engines persist across pod restarts, use the RunPod template [livepeer-comfystream-volume](https://console.runpod.io/deploy?template=j4p1g7t5vs\&ref=u8tlskew)
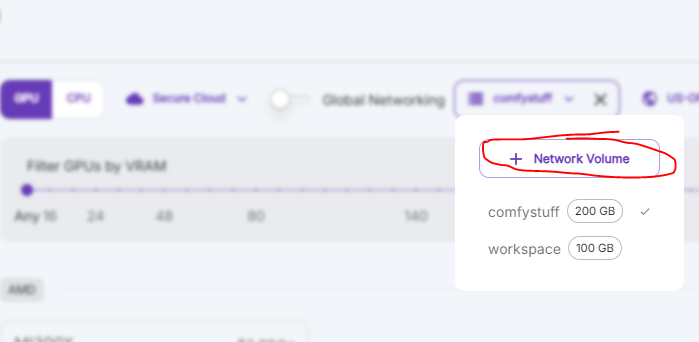
This template uses the `--use-volume` flag to save all models and engines to the mount path `/app/storage`. A network volume is required.
When using the persistent template, create and attach a network volume.
### Remote GPU
If you don't have a local GPU, you can run ComfyStream on a cloud server. Choose between a managed deployment with **RunPod** or manual setup using **Ansible**.
#### Run with RunPod
RunPod provides a simple one-click deployment of ComfyStream in a managed container environment — perfect for testing or avoiding manual setup.
Use this template to get started:
[livepeer-comfystream](https://console.runpod.io/deploy?template=w01m180vxx\&ref=u8tlskew)
RunPod does not persist pod data by default. To ensure models and engines persist across pod restarts, use the RunPod template [livepeer-comfystream-volume](https://console.runpod.io/deploy?template=j4p1g7t5vs\&ref=u8tlskew)
This template uses the `--use-volume` flag to save all models and engines to the mount path `/app/storage`. A network volume is required.
When using the persistent template, create and attach a network volume.
 Select a suitable GPU (e.g. RTX 4090), then click **Deploy On-Demand**.
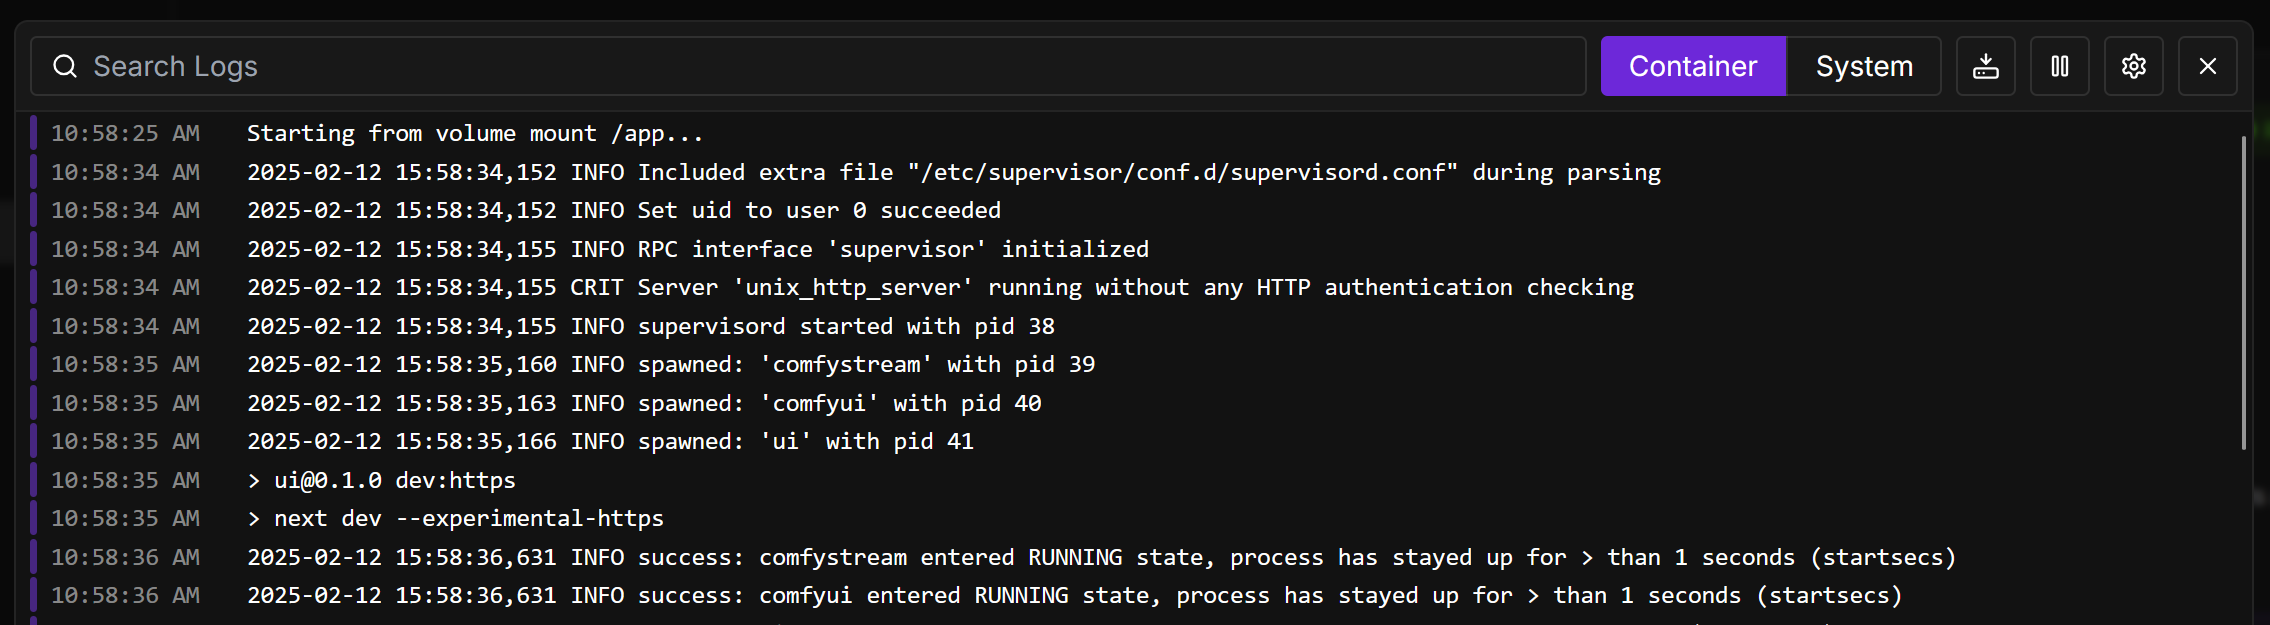
Use the **Logs** button to watch the container spin up.
Select a suitable GPU (e.g. RTX 4090), then click **Deploy On-Demand**.
Use the **Logs** button to watch the container spin up.
 Once running, click **Connect** from the pod dashboard.
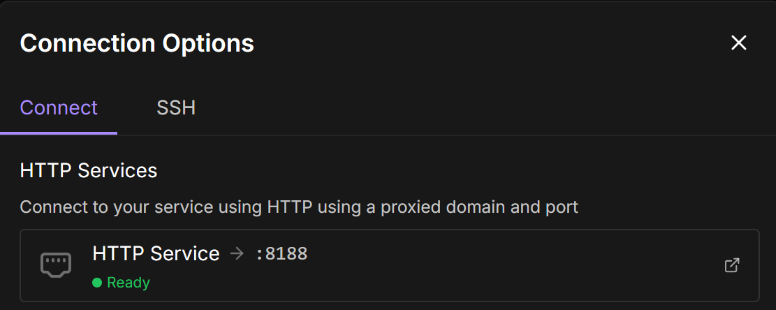 Click the **HTTP Service → :8188** link. It will open in a new browser tab.
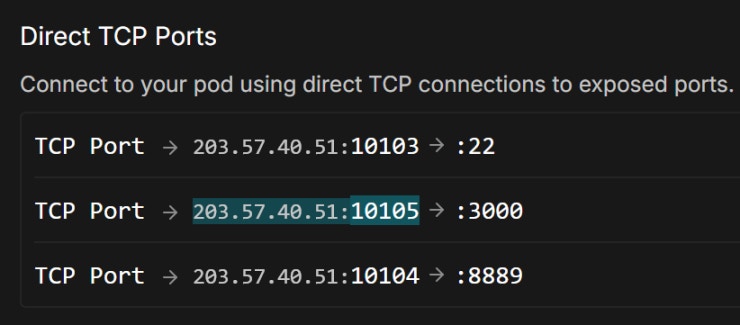
To access the ComfyStream UI, use the TCP ports to form a URL beginning with `https://` followed by the IP:port for port 3000.
You can start a live stream directly from the ComfyStream UI by keeping the stream URL as `http://localhost:8889` and selecting a workflow.
#### Deploy with Ansible
Use [Ansible](https://docs.ansible.com/ansible/latest/playbook_guide/playbooks_intro.html) to deploy ComfyStream to your own cloud VM (like AWS, GCP, Azure, or TensorDock). Great if you want more control or a repeatable, fully automated setup.
Provision a VM with at least:
* **GPU**: 20GB VRAM
* **RAM**: 16GB
* **CPU**: 4 vCPUs
* **Disk**: 100GB
Allow incoming traffic on:
* **22** (SSH – internal port)
* **8189** (ComfyStream HTTPS – internal port)
Ensure your cloud provider maps these to **public ports**. Internal port **8189** is proxied to **8188**, which serves the ComfyUI interface.
Install Ansible on your **local machine** (not the VM). See the [official installation guide](https://docs.ansible.com/ansible/latest/installation_guide/index.html).
```bash theme={null}
git clone https://github.com/livepeer/comfystream.git
cd comfystream/scripts/ansible
```
No need to install anything on the VM — Ansible sets it all up over SSH.
Open `inventory.yml` and add your VM's public IP address.
Edit the `comfyui_password` value in `plays/setup_comfystream.yaml`.
This sets the password used to access ComfyUI in your browser.
```bash theme={null}
ansible-playbook -i inventory.yaml plays/setup_comfystream.yaml
```
If you're not using a root user, add `--ask-become-pass` to enter your sudo password.
The playbook pulls a \~20GB Docker image on the VM. This may take a while on first run.
If needed, SSH into the VM and run:
```bash theme={null}
docker pull livepeer/comfystream:stable
```
Helpful if you're unsure whether the download is progressing during first-time setup.
Visit `https://:` in your browser.
***
## Accessing ComfyStream
1. Click the **ComfyStream** menu button in ComfyUI:
Click the **HTTP Service → :8188** link. It will open in a new browser tab.
To access the ComfyStream UI, use the TCP ports to form a URL beginning with `https://` followed by the IP:port for port 3000.
You can start a live stream directly from the ComfyStream UI by keeping the stream URL as `http://localhost:8889` and selecting a workflow.
#### Deploy with Ansible
Use [Ansible](https://docs.ansible.com/ansible/latest/playbook_guide/playbooks_intro.html) to deploy ComfyStream to your own cloud VM (like AWS, GCP, Azure, or TensorDock). Great if you want more control or a repeatable, fully automated setup.
Provision a VM with at least:
* **GPU**: 20GB VRAM
* **RAM**: 16GB
* **CPU**: 4 vCPUs
* **Disk**: 100GB
Allow incoming traffic on:
* **22** (SSH – internal port)
* **8189** (ComfyStream HTTPS – internal port)
Ensure your cloud provider maps these to **public ports**. Internal port **8189** is proxied to **8188**, which serves the ComfyUI interface.
Install Ansible on your **local machine** (not the VM). See the [official installation guide](https://docs.ansible.com/ansible/latest/installation_guide/index.html).
```bash theme={null}
git clone https://github.com/livepeer/comfystream.git
cd comfystream/scripts/ansible
```
No need to install anything on the VM — Ansible sets it all up over SSH.
Open `inventory.yml` and add your VM's public IP address.
Edit the `comfyui_password` value in `plays/setup_comfystream.yaml`.
This sets the password used to access ComfyUI in your browser.
```bash theme={null}
ansible-playbook -i inventory.yaml plays/setup_comfystream.yaml
```
If you're not using a root user, add `--ask-become-pass` to enter your sudo password.
The playbook pulls a \~20GB Docker image on the VM. This may take a while on first run.
If needed, SSH into the VM and run:
```bash theme={null}
docker pull livepeer/comfystream:stable
```
Helpful if you're unsure whether the download is progressing during first-time setup.
Visit `https://:` in your browser.
***
## Accessing ComfyStream
1. Click the **ComfyStream** menu button in ComfyUI:
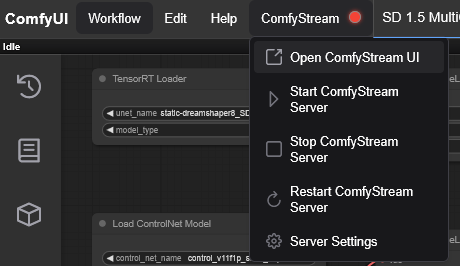 2. Open **Server Settings** to verify that ComfyStream is configured to bind to the correct interface and port.
For remote environments like RunPod, set the Host to `0.0.0.0`.
2. Open **Server Settings** to verify that ComfyStream is configured to bind to the correct interface and port.
For remote environments like RunPod, set the Host to `0.0.0.0`.
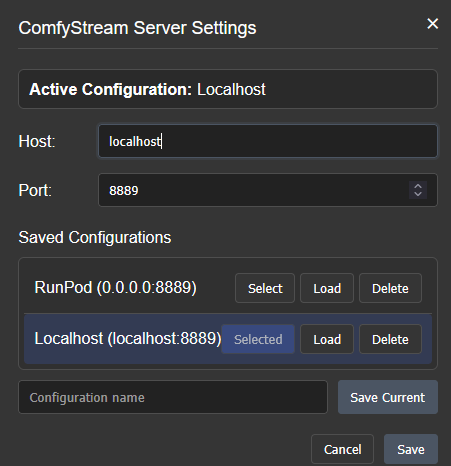 3. Click **Save** to apply the settings.
4. Open the **ComfyStream** menu again and click **Start ComfyStream Server**. Wait for the server status indicator to turn green.
You can monitor ComfyStream server logs in the ComfyUI log terminal tab.
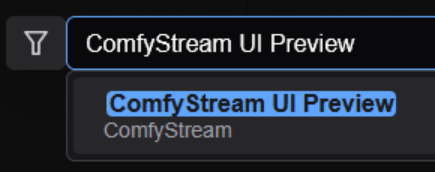
5. Click **Open ComfyStream UI** to launch it in a new tab. Alternatively, double-click the node graph and search for **ComfyStream UI Preview**.
3. Click **Save** to apply the settings.
4. Open the **ComfyStream** menu again and click **Start ComfyStream Server**. Wait for the server status indicator to turn green.
You can monitor ComfyStream server logs in the ComfyUI log terminal tab.
5. Click **Open ComfyStream UI** to launch it in a new tab. Alternatively, double-click the node graph and search for **ComfyStream UI Preview**.
 ## Troubleshooting
If you encounter a `toomanyrequests` error while pulling the Docker image, either
wait a few minutes or provide your Docker credentials when running the playbook:
```bash theme={null}
ansible-playbook -i inventory.yaml plays/setup_comfystream.yaml -e "docker_hub_username=your_dockerhub_username docker_hub_password=your_dockerhub_pat"
```
## Troubleshooting
If you encounter a `toomanyrequests` error while pulling the Docker image, either
wait a few minutes or provide your Docker credentials when running the playbook:
```bash theme={null}
ansible-playbook -i inventory.yaml plays/setup_comfystream.yaml -e "docker_hub_username=your_dockerhub_username docker_hub_password=your_dockerhub_pat"
```