ComfyUI Manager (Recommended)
Docker (Self-contained)
Install with ComfyUI Manager
If you already have ComfyUI installed, the easiest way to install ComfyStream is via the built-in ComfyUI Manager.Install ComfyUI (if needed)
v1.24.2 or older. You can do this by launching ComfyUI with the flag --front-end-version Comfy-Org/ComfyUI_frontend@v1.24.2Install ComfyUI Manager (if needed)
Install ComfyStream via Manager
- Launch ComfyUI.
- Open the Manager tab.
- Search for ComfyStream and click Install.
Restart ComfyUI
Manual Installation
If you prefer more control over the installation process, you can install ComfyStream manually using one of the following methods:Install ComfyStream via comfy-cli
Install ComfyStream via comfy-cli
Cloning Repository
Cloning Repository
Install with Docker
Run ComfyStream in a prebuilt Docker environment, either on your own GPU or a cloud server.Local GPU
Remote GPU
Local GPU
If you have a compatible GPU on Windows or Linux, you can run ComfyStream locally via Docker.Prerequisites
First, install the required system software:Windows
Windows
Install WSL 2
- From a new command prompt, run:
wsl --install- Update WSL if needed:wsl.exe --update
Launch Ubuntu in Terminal
Install NVIDIA CUDA Toolkit
Install Docker Desktop
Enable WSL 2 Engine in Docker
Verify Docker Access
docker ps should return a result.Continue with setup
Run the Docker Container
Create model and output directories
Pull the ComfyStream container
Run the container
--download-modelsdownloads some default models--build-enginesoptimizes the runtime for your GPU--serverstarts ComfyUI server (accessible on port 8188)--apienables the API server--uistarts the ComfyStream UI (accessible on port 3000)--use-volumeshould be used with a mount point at /app/storage. It is used during startup to save/load models and compiled engines to a host volume mount for persistence
--download-models and --build-engines flags are only needed the first time (or when adding new models).Access ComfyUI
Access ComfyStream UI
http://localhost:8889 and selecting a workflow.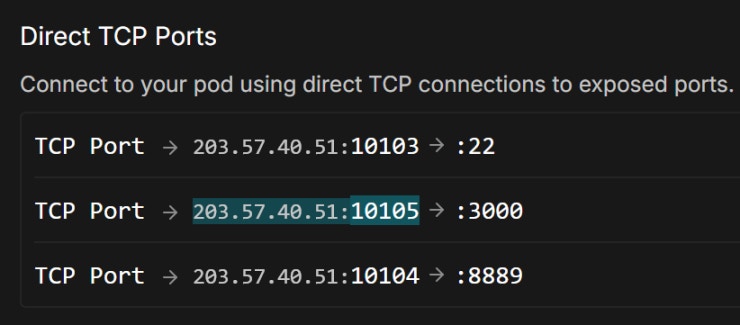
Remote GPU
If you don’t have a local GPU, you can run ComfyStream on a cloud server. Choose between a managed deployment with RunPod or manual setup using Ansible.Run with RunPod
RunPod provides a simple one-click deployment of ComfyStream in a managed container environment — perfect for testing or avoiding manual setup.Launch the RunPod template
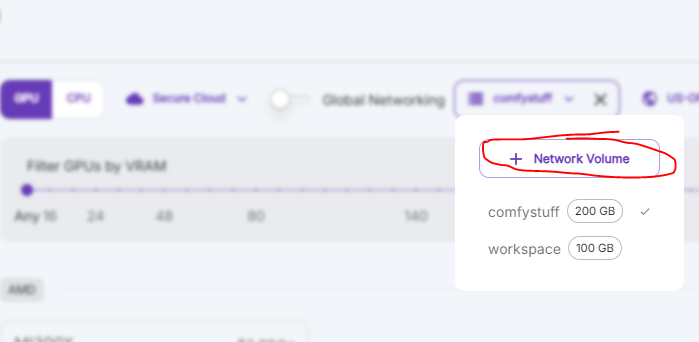
--use-volume flag to save all models and engines to the mount path /app/storage. A network volume is required.Create a network volume
Choose your GPU and deploy
Monitor deployment

Access ComfyUI
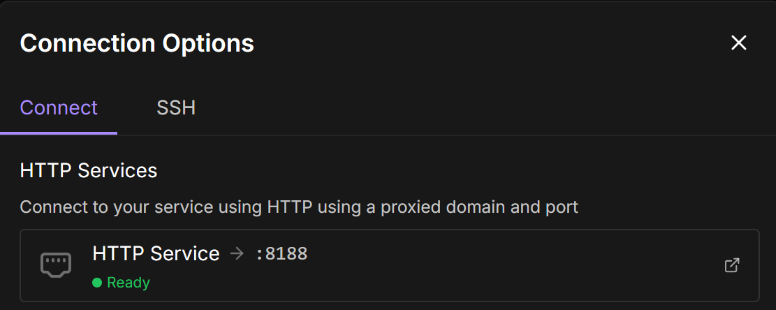
Open ComfyUI
Access ComfyStream UI
https:// followed by the IP:port for port 3000.You can start a live stream directly from the ComfyStream UI by keeping the stream URL as http://localhost:8889 and selecting a workflow.Deploy with Ansible
Use Ansible to deploy ComfyStream to your own cloud VM (like AWS, GCP, Azure, or TensorDock). Great if you want more control or a repeatable, fully automated setup.Create a cloud VM
- GPU: 20GB VRAM
- RAM: 16GB
- CPU: 4 vCPUs
- Disk: 100GB
Open required ports
- 22 (SSH – internal port)
- 8189 (ComfyStream HTTPS – internal port)
Install Ansible
Clone the ComfyStream playbook
Add your VM IP to the inventory
inventory.yml and add your VM’s public IP address.Set a custom password (optional)
comfyui_password value in plays/setup_comfystream.yaml.Run the playbook
--ask-become-pass to enter your sudo password.Monitor download progress (optional)
Open ComfyUI
https://<VM_IP>:<PUBLIC_COMFYUI_PORT> in your browser.Accessing ComfyStream
-
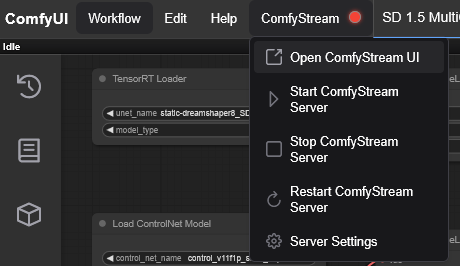
Click the ComfyStream menu button in ComfyUI:
-
Open Server Settings to verify that ComfyStream is configured to bind to the correct interface and port.
For remote environments like RunPod, set the Host to
0.0.0.0.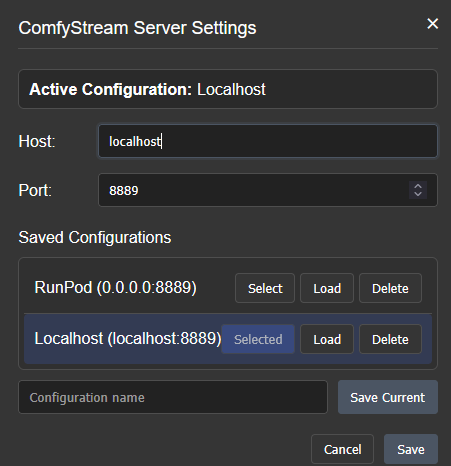
- Click Save to apply the settings.
-
Open the ComfyStream menu again and click Start ComfyStream Server. Wait for the server status indicator to turn green.
You can monitor ComfyStream server logs in the ComfyUI log terminal tab.
-
Click Open ComfyStream UI to launch it in a new tab. Alternatively, double-click the node graph and search for ComfyStream UI Preview.

Troubleshooting
Docker Hub Rate Limits (toomanyrequests error)
Docker Hub Rate Limits (toomanyrequests error)
toomanyrequests error while pulling the Docker image, either
wait a few minutes or provide your Docker credentials when running the playbook: